|
Fly of
the Month
Bob Ireton brings together his
experience in fly fishing, aquatic entomology, and knowledge of fly
tying techniques and materials, to design and tie durable and
effective flies.
|
|

Volume 5, Issue 6
June 2004

McGinty
Fly, Text, and Photography by Bob Ireton
Over the years, I have heard several ‘veteran’ fly fishermen mention the ‘McGinty’.
I finally decided to see what this fly is. I didn’t find much about the
fly, but it looks like it has been around for quite a long time. It
imitates a ‘Bumble Bee’. Other than the black and yellow bands of the
body, I wouldn’t really call it an ‘imitation’. I think it would more
accurately be a ‘searching’ or ‘attractor’ wet fly. Whatever it may be, it
certainly is an interesting looking fly!
Hook – Daiichi 1530, Dai-Riki 075,
TMC 3769, Orvis 1641, Mustad 3908, or any equivalent wet fly hook.
Size – 6-14.
Thread – 6/0 Black.
Tail – Red hackle barbs over which are barred Teal flank barbs.
Body – Bands of black and yellow chenille.
Wing – White tipped Mallard secondary wing quill sections.
Hackle – Brown or furnace hen.
TYING STEPS - click on
pictures for larger view
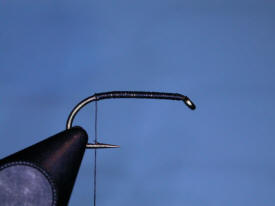
| 1 – Place the hook properly
in the vice. If the barb is too big, consider pinching it down, or
rolling it over. A micro barb may be safe for the fish. For this fly, I
am using a Daiichi 1530, size 10. Attach the working thread behind the
hook eye, and lay on a base of tightly wrapped, closely touching thread
wraps, stopping at the hook barb. Tie a half hitch. |
 |
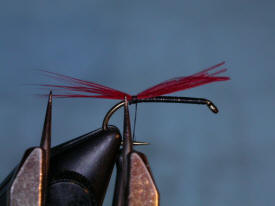
| 2 – Cut a small bunch of the
red hackle barbs. With your fingers, or a pair of tweezers, align the
tips so they are roughly even. Attach them at the tail location. The
tail should be approximately the length of the hook shank. Gauge by eye,
or measure with dividers. Secure with several turns of thread. |
 |
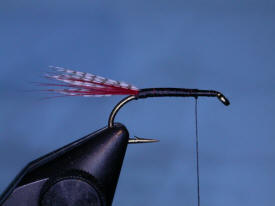
| 3 – As in step 2, prepare
the barred flank barbs. I didn’t have Teal on hand, so I substituted
Mallard. Attach the barbs over the red hackle, and secure with wraps of
thread. I run these thread wraps forward, almost to the eye. This gives
a more even body. Tie a half hitch. |
 |
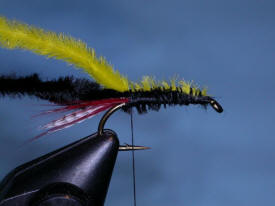
| 4 – Tie in the black and
yellow chenille, and secure it rearward, as pictured. This helps to
build up the body. Stop near the barb, and tie a half hitch. |
 |
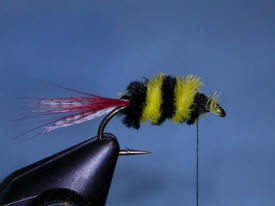
| 5 – Bring the working thread
forward, stopping several hook eyes back. As for palmering the chenille,
I tried palmering each color separately, and both at the same time. You
definitely want to palmer them both together for the best appearance.
You can try this till you get the best look. Then secure with the
thread. Snip off the excess chenille, palmer several more wraps of
thread, then tie a couple half hitches. |
 |
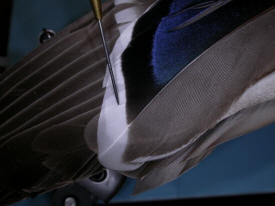
| 6 – For the wings, the
recipe calls for white tipped Mallard secondary wing feather quills. You
will need a pair, that is, a right and a left wing secondary feather.
This is how to get the pair of wings on the fly to look evenly shaped.
If you are looking at a wing, the longest feathers on the tip section
are the primary feathers. The next group of feathers, which are shorter,
are the secondary feathers. In the picture of a Mallard wing, the tip of
my bodkin is pointing to the part of the secondary feather we want to
use. |
 |
| 7 – I find that the wings
look better, and are easier to work with, if you spread a thin coat of
head cement on the underside of the feather quill you are going to use.
While the glue dries, take a little break. Then snip off the section of
the feather quill, as in the picture. Remember, a wing from each
feather, so you have a matched pair. Each wing should be attached to the
fly a little off center, so the finished fly has a small space between
the wings. Attach one side, then the other. The wings should be at
approximately 45 degrees, and slightly longer than the fly body. When
the wings have been properly aligned, secure with several thread wraps,
and then tie a couple of half hitches. |
 |
| 8 – Snip a small bunch of
the hen hackle for the legs. Attach the hackle to the underside of the
fly, just forward of the wings. Snip off the excess hackle. Build a nice
head using wraps of thread. Tie a half hitch or two, then a whip finish.
Snip off the working thread, and apply a coat of head cement to the
thread |
 |
© 2004 Robert R. Ireton, II
www.buckeyeflyfishers.com
Site designed and maintained by
Panfalone@fuse.net
|

![]()
![]()


